Tag Archives: CWMP

ACS URL configuration via DHCP Vendor Specific Information

As stated in TR-069, a CPE has 3 ways to know about the ACS URL it has to use for configuration and management; 2 of these ways are not very exciting, while the remaining one opens interesting scenarios for a true plug-and-play deployment.

The not less interesting ACS configuration methods expect the URL to be built-in in the CPE (by factory, for example), or to be configured locally via a LAN-side CPE auto-configuration protocol.

The really interesting method is based on DHCP. Anyway, a CPE doesn’t need to implement this or other methods to be TR-069 compliant; all of them are optional.

Operations

A CPE which implements this mechanism sends a DHCP Request with the string “dslforum.org” in the Vendor Class Identifier (DHCP option 60); at this point, the DHCP server can send back a DHCP ACK with the Vendor Specific Information (DHCP option 43) containing CWMP informations.

This option lets DHCP servers to send one or more vendor specific parameters to clients, encoded in the form option_code/value_length/value; CWMP specifies two parameters: option code 1 for ACS URL and option code 2 for the ProvisioningCode.

When CPE receive the URL it can start the standard CWMP connection and operations with the given ACS.

Applications

The use of this mechanism let us to build interesting scenarios: you can deploy CPEs at the customer sites without a line of configuration, you can bind CPEs CWMP ID to a customer and let DHCP/ACS do the rest, or interact with a RADIUS server to obtain the circuit ID by the IP address and automatically bind it to the right customer.

Configurations

Microsoft Windows Server 2003
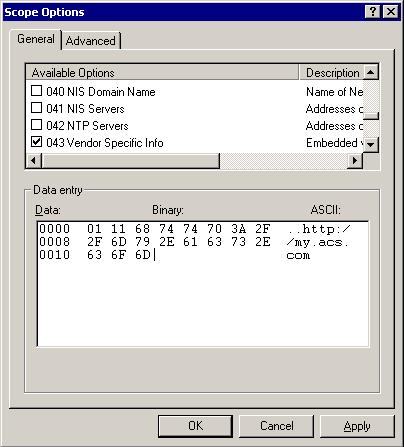
DHCP Option 43 on Win2K3 for ACS URL To setup your Microsoft Windows Server 2003 box to send DHCP Option 43 you have to edit the Scope Options and configure it in a way like the one you can see in the image (click to enlarge). To reach this window, you have to open the DHCP management console from the Administrative Tools, then expand the Superscope and the Scope you want to apply the option to. In the example, we used the URL http://my.acs.com.

dhcpd

To configure dhcpd, you can use the option vendor-encapsulated-options option:

subnet 192.168.0.0 netmask 255.255.255.0 {
        option routers 192.168.0.1;
        range 192.168.0.100 192.168.0.105;
        append dhcp-parameter-request-list 43;
        option vendor-encapsulated-options 01:11:68:74:74:70:3A:2F:2F:61:63:73:2E:6D:65:2E:63:6F:6D;
}

In any case you have to remember the 3 fields: option_code, value_length and value.
In this example we use http://acs.me.com as ACS URL, so our option will contain 0x01 (CWMP option for ACS URL), 0x11 (hex of decimal 17 = length of the URL) then the other 17 bytes forming the URL.

You may ask: why the append dhcp-parameter-request-list 43?;
Well, I tested this ACS discovery mechanism with an AVM Fritz!Box Fon 7170 firmware 58.04.67 at its factory settings; I plugged the LAN cable on its LAN1 interface then I powered it up. When it sends its DHCP REQUEST, it does not insert option 43 in the Parameter Request List, so dhcpd doesn’t send it back to the CPE. The above command tells dhcpd to always send option 43 in the OFFER/ACK.

References

TR-069 at Boadband Forum, par. “3.1 ACS Discovery”;

RFC2132 – DHCP Options and BOOTP Vendor Extensions, par. “8.4. Vendor Specific Information”.

OpenACS configuration and scripting

As first, congrats to Audrys, aka au3, OpenACS author; I played a little with OpenACS and it seems to be a really good TR-069 framework, even if in beta version.

In the last days I have found some bugs, immediately fixed by the author in the svn version; at this time (svn revision 181 and release 0.03) I suggest you to download the latest svn version and compile it (on Debian you need subversion package):

svn co http://openacs.svn.sourceforge.net/svnroot/openacs openacs
ant -f b.xml
cp dist/acs.ear /opt/jboss/server/default/deploy/

If you already have it running, be aware you need to drop db tables and lets the svn version to create them.

OpenACS exposes a javascript engine you can use to implement your configuration server logic. Of course, you need to know TR-069 (CWMP) and related Technical Reports; you can find these documents here: Broadband Forum Technical Reports

OpenACS runs the “Default” script for each Inform request it receives: in this script you can do your business and call other script.
On each script you can access objects exposed by OpenACS: you can find some information on the OpenACS wiki page on SourceForge.

You can find a Default script example at the end of this post.

Actually I’m testing OpenACS with AVM Fritz!Box Fon 7170 and they really speak the same language! Firmware upgrade and configuration changes work good, I have not yet tested parameter attributes and notification changes.

If you are interested in this matter, stay tuned! 😉

My Default script:

var i;
var sData;

sData = 'n==========================================================';
sData += 'nDeviceId:';
sData += 'n   Manufacturer: ' + cpe.Inform.DeviceId.Manufacturer;
sData += 'n   OUI: ' + cpe.Inform.DeviceId.OUI;
sData += 'n   ProductClass: ' + cpe.Inform.DeviceId.ProductClass;
sData += 'n   SerialNumber: ' + cpe.Inform.DeviceId.SerialNumber;
sData += 'nMisc:';
sData += 'n   MaxEnvelopes: ' + cpe.Inform.MaxEnvelopes;
sData += 'n   RetryCount: ' + cpe.Inform.RetryCount;
sData += 'n   CurrentTime: ' + cpe.Inform.CurrentTime;

sData += 'nEvents:' ;

for( i=0; i<=cpe.Inform.Event.length-1; i++ )
   sData += 'n   ' + cpe.Inform.Event[i].EventCode+' ['+cpe.Inform.Event[i].CommandKey + ']';

sData += 'nParams:';

for( i=0; i<=cpe.Inform.ParameterList.length-1; i++ )
   sData += 'n   ' + cpe.Inform.ParameterList[i].Name+'='+cpe.Inform.ParameterList[i].Value;

sData += 'n';
sData += 'n==========================================================';

logger( sData );

// ------------------------------------------------------------------------------
for( i=0; i<=cpe.Inform.ParameterList.length-1; i++ )
{
       switch ( cpe.Inform.ParameterList[i].Name )
       {
               case 'InternetGatewayDevice.ManagementServer.ParameterKey':
                       cpedb.ManagementServer_ParameterKey = cpe.Inform.ParameterList[i].Value;
                       break;

               case 'InternetGatewayDevice.DeviceInfo.SpecVersion':
                       cpedb.DeviceInfo_SpecVersion = cpe.Inform.ParameterList[i].Value;
                       break;

               case 'InternetGatewayDevice.DeviceInfo.HardwareVersion':
                       cpedb.DeviceInfo_HardwareVersion = cpe.Inform.ParameterList[i].Value;
                       break;

               case 'InternetGatewayDevice.DeviceInfo.SoftwareVersion':
                       cpedb.DeviceInfo_SoftwareVersion = cpe.Inform.ParameterList[i].Value;
                       break;

               case 'InternetGatewayDevice.DeviceInfo.ProvisioningCode':
                       cpedb.DeviceInfo_ProvisioningCode = cpe.Inform.ParameterList[i].Value;
                       break;

               case 'InternetGatewayDevice.ManagementServer.ConnectionRequestURL':
                       cpedb.ManagementServer_ConnectionRequestURL = cpe.Inform.ParameterList[i].Value;
                       break;

               default:
                       if( cpe.Inform.ParameterList[i].Name.indexOf( 'InternetGatewayDevice.WANDevice.' ) >= 0 )
                       {
                               cpedb.DefaultWANConnection = cpe.Inform.ParameterList[i].Name.substr( 0, cpe.Inform.ParameterList[i].Name.indexOf( '.ExternalIPAddress' ) );
                               cpedb.DefaultWANConnection_ExternalIPAddress = cpe.Inform.ParameterList[i].Value;
                       }
                       break;
       }
}
cpedb.Save()

var sEvent;
var sCommandKey;
for( i=0; i<=cpe.Inform.Event.length-1; i++ )
{
       sEvent = cpe.Inform.Event[i].EventCode;
       sCommandKey = cpe.Inform.Event[i].CommandKey;

       switch ( sEvent )
       {
               case '0 BOOTSTRAP':
                       break;

               case '1 BOOT':
                       break;

               case '2 PERIODIC':
                       break;

               case '3 SCHEDULED':
                       break;

               case '4 VALUE CHANGE':
                       break;

               case '5 KICKED':
                       break;

               case '6 CONNECTION REQUEST':
                       break;

               case '7 TRANSFER COMPLETE':
                       break;

               case '8 DIAGNOSTICS COMPLETE':
                       break;
       }
}

DoSomething();

Installing TR-069 OpenACS on a fresh Debian setup

As the title says, OpenACS is a TR-069 based automatic configuration server, implementing CPE configuration protocol CWMP.
It’s an opensource project you can find on Source Forge (http://sourceforge.net/projects/openacs/), actually in Beta status.

I put here a brief HowTo to have it running on a fresh Debian setup. Of course, the result of this installation if for testing purpose only, and not for production environment.

EDIT: I tested this on both Debian 4.0 (Etch) and Debian 5.0 (Lenny) and it’s working fine.

I still didn’t test its features, actually I just had it running.
As soon as I get TR-069 capable CPEs and a bit of time to test them I will add more content in the blog!

Install JDK 1.5

Make sure to have “contrib” in your apt source list; if you don’t have, add and update aptitude.

nano /etc/apt/sources.list

deb http://YOUR_MIRROR/debian/ etch main contrib
deb-src http://YOUR_MIRROR/debian/ etch main contrib

Install some utilities to build JDK Debian package:

apt-get install java-package fakeroot

As non-root user, get Sun JDK 5.0 Update 17 from http://java.sun.com/j2se/1.5.0/download.jsp (non-RPM file):

wget URL

Build the Debian package

fakeroot make-jpkg jdk-1_5_0_17-linux-i586.bin

Install the .deb package (as root)

dpkg -i sun-j2sdk1.5_1.5.0+update17_i386.deb

Install JBoss

Get JBoss Application Server 4.2.2 zip file from http://www.jboss.org/download/:

wget URL

Unzip it:

unzip jboss-4.2.2.GA.zip -d /opt/
cd /opt
mv jboss-4.2.2.GA/ jboss

Run the server to test it:

cd /opt/jboss/bin
./run.sh -b 0.0.0.0

If the server fails starting, check it’s using the right Java VM; you can edit the bin/run.conf file and set JAVA_HOME=”/usr/lib/j2sdk1.5-sun”

Test the server: browse the homepage at http://YOUR_IP_ADDRESS:8080/

Hit CTRL+C to stop the server.

Install MySQL

apt-get install mysql-server-5.0

Install MySql Connector/J

Get Connector/J from http://dev.mysql.com/downloads/connector/j/5.1.html

wget URL

Extract and put mysql-connector-java-5.1.7-bin.jar into jboss/server/default/lib/

tar -xzvf mysql-connector-java-5.1.7.tar.gz
cd mysql-connector-java-5.1.7
mv mysql-connector-java-5.1.7-bin.jar /opt/jboss/server/default/lib/

Compile and deploy OpenACS

Install Apache Ant:

apt-get install ant

Get openacs-src file (openacs-src-0.03.zip) from SourceForge:

wget URL
unzip openacs-src-0.03.zip
cd openacs

Edit build.properties and set the right path to jboss (jboss=/opt/jboss/server/default)

nano build.properties

Edit the web.xml file and set the right path to the firmware directory (org.openacs.fwbase context-param):

nano acs-war/web/WEB-INF/web.xml

[… cut …]
    <context-param>
        <description>Path for firmware images</description>
        <param-name>org.openacs.fwbase</param-name>
        <param-value>/firmware/</param-value>
    </context-param>
[… cut …]
Run ant to build OpenACS

ant

Copy dist/acs.ear to jboss/server/default/deploy:

cp dist/acs.ear /opt/jboss/server/default/deploy/

Create and edit jboss/server/default/deploy/openacs-ds.xml, configuring data source

nano /opt/jboss/server/default/deploy/openacs-ds.xml

openacs-ds.xml:

<?xml version="1.0" encoding="UTF-8"?>
<datasources>
    <local-tx-datasource>
        <jndi-name>ACS</jndi-name>
        <connection-url>jdbc:mysql://localhost/ACS</connection-url>
        <driver-class>com.mysql.jdbc.Driver</driver-class>
        <user-name>openacs</user-name>
        <password>openacs</password>
        <min-pool-size>5</min-pool-size>
        <max-pool-size>20</max-pool-size>
        <idle-timeout-minutes>5</idle-timeout-minutes>
    </local-tx-datasource>
</datasources>

Create openacs-service.xml in jboss/server/default/deploy/jms

nano /opt/jboss/server/default/deploy/jms/openacs-service.xml

<?xml version="1.0" encoding="UTF-8"?>
<server>
    <mbean code="org.jboss.mq.server.jmx.Queue" name="jboss.mq.destination:service=Queue,name=acsQueue">
        <depends optional-attribute-name="DestinationManager">jboss.mq:service=DestinationManager</depends>
    </mbean>
</server>

Create ACS database and openacs user on MySQL, as in openacs-ds.xml:

mysql
CREATE DATABASE ACS;
GRANT ALL ON ACS.* TO openacs IDENTIFIED BY 'openacs';

Create ACS tables:

echo "CREATE TABLE HardwareModelBean (
  id int(11) NOT NULL auto_increment,
  oui varchar(250) default NULL,
  hclass varchar(250) default NULL,
  DisplayName varchar(250) default NULL,
  manufacturer varchar(250) default NULL,
  PRIMARY KEY  (id)
);

CREATE TABLE HostsBean (
  id int(11) NOT NULL auto_increment,
  serialno varchar(250) default NULL,
  url varchar(250) default NULL,
  configname varchar(250) default NULL,
  currentsoftware varchar(250) default NULL,
  sfwupdtime timestamp NOT NULL default CURRENT_TIMESTAMP on update CURRENT_TIMESTAMP,
  sfwupdres varchar(250) default NULL,
  cfgupdres varchar(250) default NULL,
  lastcontact timestamp NOT NULL default '0000-00-00 00:00:00',
  cfgupdtime timestamp NOT NULL default '0000-00-00 00:00:00',
  hardware varchar(250) default NULL,
  cfgversion varchar(250) default NULL,
  props longblob,
  hwid int(11) default NULL,
  username varchar(250) default NULL,
  password varchar(250) default NULL,
  authtype int(11) default NULL,
  customerid varchar(250) default NULL,
  conrequser varchar(250) default NULL,
  conreqpass varchar(250) default NULL,
  PRIMARY KEY  (id)
);

CREATE TABLE ConfigurationBean (
  name varchar(250) NOT NULL,
  hardware varchar(250) default NULL,
  config longblob,
  filename varchar(250) default NULL,
  version varchar(250) default NULL,
  PRIMARY KEY  (name)
);

CREATE TABLE ScriptBean (
  name varchar(250) NOT NULL,
  script longblob,
  description varchar(250) default NULL,
  PRIMARY KEY  (name)
);

CREATE TABLE SoftwareBean (
  hardware varchar(250) NOT NULL,
  version varchar(250) NOT NULL,
  minversion varchar(250) default NULL,
  url varchar(250) default NULL,
  size bigint(20) NOT NULL,
  filename varchar(250) default NULL,
  PRIMARY KEY  (hardware,version)
);" | mysql ACS;

Create the firmware directory:

mkdir /firmware

Run the server:

cd /opt/jboss/bin
./run.sh -b 0.0.0.0

Browse the OpenACS web interface at http://YOUR_IP_ADDRESS:8080/openacs/index.jsf

Some useful links:
OpenACS Wiki: http://openacs.wiki.sourceforge.net/
Getting JDK 1.5 and Tomcat 5.5 up and running in Debian Linux: http://nileshk.com/node/36
JBoss on Debian quickstart: http://lorenzod8n.wordpress.com/2008/03/02/jboss-on-debian-quickstart/