Tag Archives: Zabbix

Zabbix: monitoring HSRP on Cisco devices

On the basis of my previous post Cisco HSRP monitoring using SNMP I decided to extend the Zabbix lightweight dynamic template for SNMP routers by adding a new template, which uses part of the configuration already seen in order to monitor Cisco HSRP status. Here it is: Template_Cisco_HSRPGroup.

What we need is to have a trigger fired when a device changes its HSRP state on the LAN side; with the right configuration it may help to understand when something goes wrong on the WAN side.

As seen on the Cisco HSRP monitoring using SNMP post we need two parameters: SNMP interface ID and HSRP group. We already have the first, because each monitored host has the macro used by the Template_Lightweight_Dynamic_SNMPv2_Router: {$LAN_IF_IDX}. We just have to add a new macro to the host, {$HSRP_GROUP}, where we’ll put the HSRP group number used in the router’s configuration, and use it in the new template’s items:

Description: HSRP Group {$HSRP_GROUP} state
SNMP OID: .1.3.6.1.4.1.9.9.106.1.2.1.1.15.{$LAN_IF_IDX}.{$HSRP_GROUP}
SNMP community: public
Key: cHsrpGrpStandbyState

Description: HSRP Group {$HSRP_GROUP} active IP
SNMP OID: .1.3.6.1.4.1.9.9.106.1.2.1.1.13.{$LAN_IF_IDX}.{$HSRP_GROUP}
SNMP community: public
Key: cHsrpGrpActiveRouter

Description: HSRP Group {$HSRP_GROUP} standby IP
SNMP OID: .1.3.6.1.4.1.9.9.106.1.2.1.1.14.{$LAN_IF_IDX}.{$HSRP_GROUP}
SNMP community: public
Key: cHsrpGrpStandbyRouter

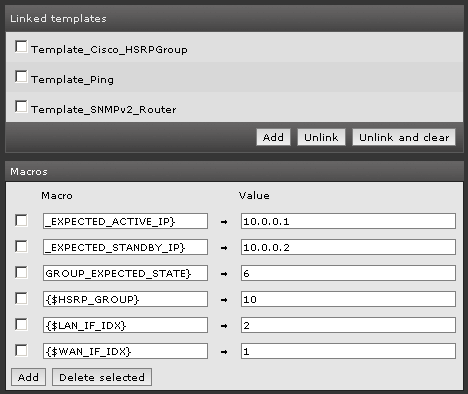
At this point we add 3 more macros to tell Zabbix which values we expect to find for the HSRP group state, active IP and standby IP: {$HSRP_GROUP_EXPECTED_STATE}, {$HSRP_GROUP_EXPECTED_ACTIVE_IP} and {$HSRP_GROUP_EXPECTED_STANDBY_IP}.

Here are the host macros used by Template_Lightweight_Dynamic_SNMPv2_Router and by the new Template_Cisco_HSRPGroup:

Simple triggers will notice unexpected behaviour:

Name: Unexpected HSRP group state
Expression: {Template_Cisco_HSRPGroup:cHsrpGrpStandbyState.last(0)}#{$HSRP_GROUP_EXPECTED_STATE}
Severity: High

Name: Unexpected HSRP active router
Expression: {Template_Cisco_HSRPGroup:cHsrpGrpActiveRouter.str("{$HSRP_GROUP_EXPECTED_ACTIVE_IP}")}=0
Severity: High

...

Here you can find the XML Template: Template_Cisco_HSRPGroup.zip

Zabbix: a lightweight dynamic template for SNMP routers

I built the following Zabbix template to monitor small routers, with just two interfaces (WAN and LAN), which have been deployed as CPE for some customers.

What I needed was only interfaces monitoring, such as traffic, packets, status, but I needed to configure it for many etherogeneous devices, that means different SNMP indexing and naming.

I decided to build a small SNMP-based template using dynamic parameters and host macros.

Each template’s item has an SNMP OID value containing a macro reference:

Description: LAN - Description
Type: SNMPv2 agent
SNMP OID: .1.3.6.1.2.1.2.2.1.2.{$LAN_IF_IDX}
Key: ifDescr-LAN

Description: LAN - In Octets
Type: SNMPv2 agent
SNMP OID: .1.3.6.1.2.1.2.2.1.10.{$LAN_IF_IDX}
Key: ifInOctets-LAN

Description: WAN - Description
Type: SNMPv2 agent
SNMP OID: .1.3.6.1.2.1.2.2.1.2.{$WAN_IF_IDX}
Key: ifDescr-WAN

...

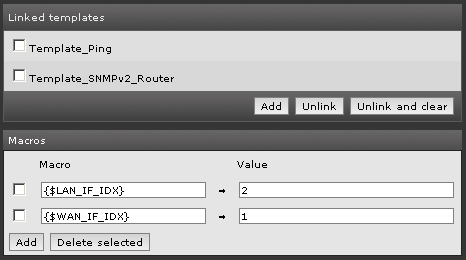
On each host you apply this template to you need to add two macros, {$LAN_IF_IDX} and {$WAN_IF_IDX}, containing the value of the LAN and WAN interface SNMP index:

In order to understand which value to use in the macro you can “ask it” to your router or run a snmpwalk on it:

CiscoRouter#show snmp mib ifmib ifindex FastEthernet 0/0
Interface = FastEthernet0/0, Ifindex = 1

root@NMS:~# snmpwalk -v 2c -c public 10.0.0.1 .1.3.6.1.2.1.2.2.1.2
iso.3.6.1.2.1.2.2.1.2.1 = STRING: "FastEthernet0/0"
iso.3.6.1.2.1.2.2.1.2.2 = STRING: "FastEthernet0/1"
iso.3.6.1.2.1.2.2.1.2.3 = STRING: "VoIP-Null0"
iso.3.6.1.2.1.2.2.1.2.4 = STRING: "Null0"
iso.3.6.1.2.1.2.2.1.2.5 = STRING: "Loopback1"

The template includes interfaces description, status, traffic (in bps and packets per second), a trigger to detect status transition and graphs.

You can find the Zabbix Template_Lightweight_Dynamic_SNMPv2_Router here; instructions about importing the template can be found on the Zabbix documentation web site.

Zabbix: send SMS using gammu-smsd

Recently I needed to setup a Zabbix distribution with SMS notifications. I had a Momo Design MD-@ USB Internet key to be used as GSM modem, with a BT Italia (Vodafone) SIM card. I used the 1.8.5 version of Zabbix, installed using the apt tool on a Ubuntu 11.10.

The Zabbix built-in SMS notification system seemed to have a bug, which cause a triple notification to be sent on every trigger action (bug ID ZBX-3507), so I preferred to use an external (custom) script and a third party tool: gammu-smsd.

This daemon connects to the GSM modem and listens for an outgoing queue; when you need to send a message, you just have to “inject” it into its queue, then it does the rest.

Installation

As soon as I plugged the USB key into the server, Ubuntu recognized it:

Oct 27 13:57:08 MyMachineName kernel: [764858.260009] usb 4-1: new full speed USB device number 2 using uhci_hcd
Oct 27 13:57:08 MyMachineName kernel: [764858.481158] cdc_acm 4-1:1.0: ttyACM0: USB ACM device
Oct 27 13:57:08 MyMachineName kernel: [764858.484118] usbcore: registered new interface driver cdc_acm
Oct 27 13:57:08 MyMachineName kernel: [764858.484121] cdc_acm: USB Abstract Control Model driver for USB modems and ISDN adapters

Then I installed gammu-smsd and edited its configuration file:

apt-get install gammu-smsd
cat /etc/gammu-smsdrc

# Configuration file for Gammu SMS Daemon

# Gammu library configuration, see gammurc(5)
[gammu]
# Please configure this!
port = /dev/ttyACM0
connection = at
# Debugging
logformat = textall

# SMSD configuration, see gammu-smsdrc(5)
[smsd]
service = files
logfile = /var/log/gammu-smsd
# Increase for debugging information
debuglevel = 0
ReceiveFrequency = 300
# Paths where messages are stored
inboxpath = /var/spool/gammu/inbox/
outboxpath = /var/spool/gammu/outbox/
sentsmspath = /var/spool/gammu/sent/
errorsmspath = /var/spool/gammu/error/

The port parameter is the device where the modem is mapped. This may change on other system.

I changed the logfile parameter also, because by default it is configured to log to syslog. You need to give the right permissions to it:

chmod a+rw /var/log/gammu-smsd

The ReceiveFrequency is used to tell gammu-smsd how often to check for incoming SMS; by default it is every 1 second, but in my case I didn’t need to receive SMS, so I raised it to 5 minutes.

An important parameter is PIN on the [smsd] section: in my case I removed the PIN check from my SIM card, so I didn’t use it in the configuration file.

In order to avoid “Cannot open file” errors, I also granted access to the device to everyone:

chmod a+rw /dev/ttyACM0

At this time I reloaded gammu-smsd and tested the configuration:

/etc/init.d/gammu-smsd restart
echo "Test message" | gammu-smsd-inject TEXT 335123456

(replace 335123456 with your mobile phone number!)

The gammu-smsd-monitor utility let you to check your modem status too.

In order to rotate gammu-smsd log file, I wrote a logrotate.d configuration file too:

cat /etc/logrotate.d/gammu-smsd
/var/log/gammu-smsd {
    daily
    rotate 7
    compress
    missingok
    notifempty
}

Zabbix configuration

As first I configured a new media type using the Zabbix administration front-end:

Administration / Media types -> Create Media Type

Description: SMS-via-gammu
Type: Script
Script name: sendsms

sendsms is the name of the external script I used for my custom notification system.

Then I configured the new media type for my Zabbix user:

Administration / Users -> select Users in the top right corner – edit your user Media: Add

Type: SMS-via-gammu
Send to: 335123456
When active, Use if severity: as you wish
Status: Enabled

Of course, I had an Action configured too, but for more information I suggest you to read about it on the official documentation page.

In order to configure Zabbix to use external notification scripts, I verified that the AlertScriptsPath was present in the configuration file:

cat /etc/zabbix/zabbix_server.conf | grep AlertScriptsPath
AlertScriptsPath=/etc/zabbix/alert.d/

/etc/zabbix/alert.d is the directory where notifications script have to be.

Then I added the zabbix user to the gammu group, in order to give it the right permissions to inject messages into the outgoing gammu queue…

adduser zabbix gammu

… then I restarted Zabbix:

/etc/init.d/zabbix-server restart

This is the script I used to inject Zabbix notifications into the gammu outgoing queue (/etc/zabbix/alert.d/sendsms):

#!/bin/sh

# $1    recipient
# $2    subject
# $3    message

TMPFILE=`mktemp -t`

echo "$3" >> $TMPFILE

cat $TMPFILE | gammu-smsd-inject TEXT $1

rm $TMPFILE
chmod a+x /etc/zabbix/alert.d/sendsms

At this time I tested it by creating a new trigger with fake values (temperature < 100 °C, or everything else could let an action to be raised).

References

Zabbix.com: Configuration page on the official documentation site

gammu-smsd: Gammu SMSD
Book review: Zabbix 1.8 Network Monitoring

Zabbix is a good Network Monitoring System, recently grown up to version 1.8. The book I was pleased to review is an easy guide to go deep into its mechanisms and to discover its many features.

The book covers every aspect of Zabbix, from the installation process to distributed monitoring, with a in-depth coverage of hosts monitoring techniques and user notification system. Many practical examples and screenshots help the reader to configure the system and have a fully working setup in a few minutes.

A whole chapter is dedicated to the SNMP integration, with a good explaination of the protocol and very practical tips about the use of Net-SNMP suite and MIBs. The author also included a good tutorial about the setup of a traps handling procedure with hosts binding.

Two more noteworthy chapters are about the use of templates and macros to simplify the configuration of Zabbix, and advanced monitoring, such as using external scripts or data already gathered by other systems.

If you plan to use Zabbix and you are starting from scratch, or even if you already use it but you want to deepen some aspects, I really suggest you to have a look at this book! In the meantime, here you can find a sample chapter: Getting your first Notification (PDF).

My two pennies worth 😉

Details

Title: Zabbix 1.8 Network Monitoring
Language: English
Paperback: 428 pages [ 235mm x 191mm ]
Release Date: March 2010
ISBN: 184719768X
ISBN 13: 978-1-847197-68-9
Author(s): Rihards Olups
More info: Packt Publishing web site

Zabbix: how to monitor Radius (and other services) with external check items and netcat (nc)

You can monitor Radius (and other services too, such as DNS and other) with Zabbix external check feature and netcat (nc).

How do external check items work?

“External check” items are monitored by Zabbix using external scripts, running on the server; you can create your own scripts and put them in the ExternalScripts directory, as defined by the zabbix_server.conf file:

# Location of external scripts
ExternalScripts=/etc/zabbix/externalscripts

You can setup an external check item using the following syntax for the key parameter:

Type: External check
Key: script[parameters]

For example, you can configure Zabbix to run the script checkradius.sh and to pass it the host IP address:

Description: Radius – Authentication
Type: External check
Key: checkradius.sh[{IPADDRESS}]
Type of information: Numeric (unsigned)

Zabbix will execute checkradius.sh HOSTNAME|HOSTIPADDRESS IPADDRESS, where HOSTNAME|HOSTIPADDRESS is the host name or IP address (it depends on the “Connect to” host parameter), and IPADDRESS is the value of the macro {IPADDRESS} used as parameter.

How to use netcat with external check items

With netcat (nc) you can send a host UDP or TCP data and get a response from it. For example, you can send a Radius authentication packet and wait for a response from the server.

Of course Netcat knows nothing about Radius or other protocols, it simply sends and receives data, so you have to forge an Access-Request packet and to parse an Access-Accept response.

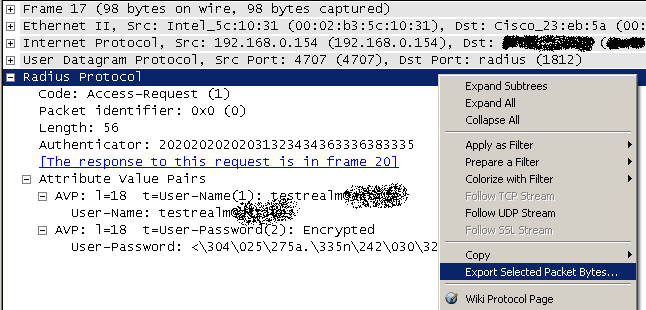
Radius - Access-Request packetTo build the Radius Access-Request packet I simply sniffed a real packet using Wireshark and then I exported it to my Zabbix server (you can see it in the picture).

Once you have sent the Access-Request packet, you should receive an Access-Accept response from your server, so you can parse the response to see if it is the one you expected. You can do this using od to convert netcat output in hex and then grep the Radius Access-Accept code (0x02).

External check item and script configuration

My script uses only one argument, the one Zabbix always passes to external scripts, so I did’nt configure it to pass other parameters:

Description: Radius – Authentication
Type: External check
Key: checkradius.sh[]
Type of information: Numeric (unsigned)

The script gets the Radius packet to send to the server from the $1.rad file, where $1 is the host name or IP address; for example, for the Radius server at 10.0.0.1 I will put the Access-Request packet in the 10.0.0.1.rad file.

EDIT 2011-10-13: I think I forgot the “#! /bin/bash” line!

UPDATE 2011-12-01: I added the timelimit command to the script (you can install it with apt-get install timelimit). This command runs another command (nc in my script) and kills it after a specified time lapse. This is useful to handle endless netcat timeout. Remember to raise the default Timeout in the Zabbix configuration file in order to match your command timeout (file /etc/zabbix/zabbix_server.conf, parameter Timeout=10).

#! /bin/bash

cat /etc/zabbix/externalscripts/$1.rad | 
        timelimit -q -t 5 -T 5 nc -u -w 1 $1 1812 | od -t x1 | 
        grep &quot;0000000 02&quot; &gt; /dev/null
if [ $? == 0 ]; then
        echo 1
        exit 1
else
        echo 0
        exit 0
fi

References

Radius RFC: http://www.ietf.org/rfc/rfc2865.txt

Zabbix: http://www.zabbix.com/

Netcat: http://netcat.sourceforge.net/

Wireshark: http://www.wireshark.org/