Category Archives: Systems Administration

Cisco HSRP monitoring using SNMP

Cisco HSRP MIB is defined in CISCO-HSRP-MIB and CISCO-HSRP-EXT-MIB; for a basic SNMP monitoring the first MIB is more than enough.

The most important table in order to get HSRP status information is cHsrpGrpTable, where we can find as many cHsrpGrpEntry objects as HSRP groups configured in the router. Each cHsrpGrpEntry object represents the HSRP configuration and status for a given HSRP group number on a given interface; it has, so, a double index: SNMP interface ID and HSRP group number.

Here is an example of a snmpwalk over a router:

root@NMS:~# snmpwalk -v 2c -c public 10.0.0.1 .1.3.6.1.4.1.9.9.106.1.2.1.1
iso.3.6.1.4.1.9.9.106.1.2.1.1.2.2.10 = STRING: "cisco"
iso.3.6.1.4.1.9.9.106.1.2.1.1.3.2.10 = Gauge32: 255
iso.3.6.1.4.1.9.9.106.1.2.1.1.4.2.10 = INTEGER: 1
iso.3.6.1.4.1.9.9.106.1.2.1.1.5.2.10 = Gauge32: 0
iso.3.6.1.4.1.9.9.106.1.2.1.1.6.2.10 = INTEGER: 2
iso.3.6.1.4.1.9.9.106.1.2.1.1.7.2.10 = Gauge32: 0
iso.3.6.1.4.1.9.9.106.1.2.1.1.8.2.10 = Gauge32: 0
iso.3.6.1.4.1.9.9.106.1.2.1.1.9.2.10 = Gauge32: 3000
iso.3.6.1.4.1.9.9.106.1.2.1.1.10.2.10 = Gauge32: 10000
iso.3.6.1.4.1.9.9.106.1.2.1.1.11.2.10 = IpAddress: 10.0.0.254
iso.3.6.1.4.1.9.9.106.1.2.1.1.12.2.10 = INTEGER: 1
iso.3.6.1.4.1.9.9.106.1.2.1.1.13.2.10 = IpAddress: 10.0.0.1
iso.3.6.1.4.1.9.9.106.1.2.1.1.14.2.10 = IpAddress: 10.0.0.2
iso.3.6.1.4.1.9.9.106.1.2.1.1.15.2.10 = INTEGER: 6
iso.3.6.1.4.1.9.9.106.1.2.1.1.16.2.10 = Hex-STRING: 00 00 0C 07 AC 0A
iso.3.6.1.4.1.9.9.106.1.2.1.1.17.2.10 = INTEGER: 1

The first highlighted value is the SNMP interface ID: you can get the SNMP ID for a given interface using the show snmp mib ifmib ifindex command:

CiscoRouter#show snmp mib ifmib ifindex FastEthernet 0/1
Interface = GigabitEthernet0/1, Ifindex = 2.

The second highlighted value is the HSRP group, the one you use while configuring HSRP:

interface FastEthernet0/1
 standby 10 ip 10.0.0.254
 standby 10 priority 255
 ...

In order to monitor the HSRP group state you just have to grab the cHsrpGrpStandbyState parameter (OID iso.3.6.1.4.1.9.9.106.1.2.1.1.15.2.10), which can have one of the following values:

1: initial
2: learn
3: listen
4: speak
5: standby
6: active

In my previous example the router was in the active state.

References

Cisco.com: Hot Standby Router Protocol Features and Functionality

Cisco.com: CISCO-HSRP-MIB

Cisco.com: CISCO-HSRP-EXT-MIB

Wikipedia: HSRP

Zabbix: a lightweight dynamic template for SNMP routers

I built the following Zabbix template to monitor small routers, with just two interfaces (WAN and LAN), which have been deployed as CPE for some customers.

What I needed was only interfaces monitoring, such as traffic, packets, status, but I needed to configure it for many etherogeneous devices, that means different SNMP indexing and naming.

I decided to build a small SNMP-based template using dynamic parameters and host macros.

Each template’s item has an SNMP OID value containing a macro reference:

Description: LAN - Description
Type: SNMPv2 agent
SNMP OID: .1.3.6.1.2.1.2.2.1.2.{$LAN_IF_IDX}
Key: ifDescr-LAN

Description: LAN - In Octets
Type: SNMPv2 agent
SNMP OID: .1.3.6.1.2.1.2.2.1.10.{$LAN_IF_IDX}
Key: ifInOctets-LAN

Description: WAN - Description
Type: SNMPv2 agent
SNMP OID: .1.3.6.1.2.1.2.2.1.2.{$WAN_IF_IDX}
Key: ifDescr-WAN

...

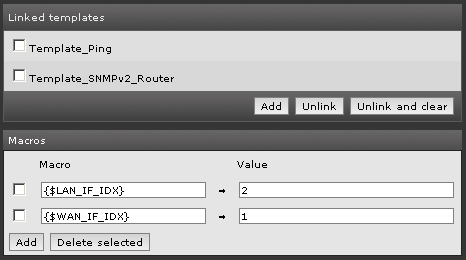
On each host you apply this template to you need to add two macros, {$LAN_IF_IDX} and {$WAN_IF_IDX}, containing the value of the LAN and WAN interface SNMP index:

In order to understand which value to use in the macro you can “ask it” to your router or run a snmpwalk on it:

CiscoRouter#show snmp mib ifmib ifindex FastEthernet 0/0
Interface = FastEthernet0/0, Ifindex = 1

root@NMS:~# snmpwalk -v 2c -c public 10.0.0.1 .1.3.6.1.2.1.2.2.1.2
iso.3.6.1.2.1.2.2.1.2.1 = STRING: "FastEthernet0/0"
iso.3.6.1.2.1.2.2.1.2.2 = STRING: "FastEthernet0/1"
iso.3.6.1.2.1.2.2.1.2.3 = STRING: "VoIP-Null0"
iso.3.6.1.2.1.2.2.1.2.4 = STRING: "Null0"
iso.3.6.1.2.1.2.2.1.2.5 = STRING: "Loopback1"

The template includes interfaces description, status, traffic (in bps and packets per second), a trigger to detect status transition and graphs.

You can find the Zabbix Template_Lightweight_Dynamic_SNMPv2_Router here; instructions about importing the template can be found on the Zabbix documentation web site.

Zabbix: send SMS using gammu-smsd

Recently I needed to setup a Zabbix distribution with SMS notifications. I had a Momo Design MD-@ USB Internet key to be used as GSM modem, with a BT Italia (Vodafone) SIM card. I used the 1.8.5 version of Zabbix, installed using the apt tool on a Ubuntu 11.10.

The Zabbix built-in SMS notification system seemed to have a bug, which cause a triple notification to be sent on every trigger action (bug ID ZBX-3507), so I preferred to use an external (custom) script and a third party tool: gammu-smsd.

This daemon connects to the GSM modem and listens for an outgoing queue; when you need to send a message, you just have to “inject” it into its queue, then it does the rest.

Installation

As soon as I plugged the USB key into the server, Ubuntu recognized it:

Oct 27 13:57:08 MyMachineName kernel: [764858.260009] usb 4-1: new full speed USB device number 2 using uhci_hcd
Oct 27 13:57:08 MyMachineName kernel: [764858.481158] cdc_acm 4-1:1.0: ttyACM0: USB ACM device
Oct 27 13:57:08 MyMachineName kernel: [764858.484118] usbcore: registered new interface driver cdc_acm
Oct 27 13:57:08 MyMachineName kernel: [764858.484121] cdc_acm: USB Abstract Control Model driver for USB modems and ISDN adapters

Then I installed gammu-smsd and edited its configuration file:

apt-get install gammu-smsd
cat /etc/gammu-smsdrc

# Configuration file for Gammu SMS Daemon

# Gammu library configuration, see gammurc(5)
[gammu]
# Please configure this!
port = /dev/ttyACM0
connection = at
# Debugging
logformat = textall

# SMSD configuration, see gammu-smsdrc(5)
[smsd]
service = files
logfile = /var/log/gammu-smsd
# Increase for debugging information
debuglevel = 0
ReceiveFrequency = 300
# Paths where messages are stored
inboxpath = /var/spool/gammu/inbox/
outboxpath = /var/spool/gammu/outbox/
sentsmspath = /var/spool/gammu/sent/
errorsmspath = /var/spool/gammu/error/

The port parameter is the device where the modem is mapped. This may change on other system.

I changed the logfile parameter also, because by default it is configured to log to syslog. You need to give the right permissions to it:

chmod a+rw /var/log/gammu-smsd

The ReceiveFrequency is used to tell gammu-smsd how often to check for incoming SMS; by default it is every 1 second, but in my case I didn’t need to receive SMS, so I raised it to 5 minutes.

An important parameter is PIN on the [smsd] section: in my case I removed the PIN check from my SIM card, so I didn’t use it in the configuration file.

In order to avoid “Cannot open file” errors, I also granted access to the device to everyone:

chmod a+rw /dev/ttyACM0

At this time I reloaded gammu-smsd and tested the configuration:

/etc/init.d/gammu-smsd restart
echo "Test message" | gammu-smsd-inject TEXT 335123456

(replace 335123456 with your mobile phone number!)

The gammu-smsd-monitor utility let you to check your modem status too.

In order to rotate gammu-smsd log file, I wrote a logrotate.d configuration file too:

cat /etc/logrotate.d/gammu-smsd
/var/log/gammu-smsd {
    daily
    rotate 7
    compress
    missingok
    notifempty
}

Zabbix configuration

As first I configured a new media type using the Zabbix administration front-end:

Administration / Media types -> Create Media Type

Description: SMS-via-gammu
Type: Script
Script name: sendsms

sendsms is the name of the external script I used for my custom notification system.

Then I configured the new media type for my Zabbix user:

Administration / Users -> select Users in the top right corner – edit your user Media: Add

Type: SMS-via-gammu
Send to: 335123456
When active, Use if severity: as you wish
Status: Enabled

Of course, I had an Action configured too, but for more information I suggest you to read about it on the official documentation page.

In order to configure Zabbix to use external notification scripts, I verified that the AlertScriptsPath was present in the configuration file:

cat /etc/zabbix/zabbix_server.conf | grep AlertScriptsPath
AlertScriptsPath=/etc/zabbix/alert.d/

/etc/zabbix/alert.d is the directory where notifications script have to be.

Then I added the zabbix user to the gammu group, in order to give it the right permissions to inject messages into the outgoing gammu queue…

adduser zabbix gammu

… then I restarted Zabbix:

/etc/init.d/zabbix-server restart

This is the script I used to inject Zabbix notifications into the gammu outgoing queue (/etc/zabbix/alert.d/sendsms):

#!/bin/sh

# $1    recipient
# $2    subject
# $3    message

TMPFILE=`mktemp -t`

echo "$3" >> $TMPFILE

cat $TMPFILE | gammu-smsd-inject TEXT $1

rm $TMPFILE
chmod a+x /etc/zabbix/alert.d/sendsms

At this time I tested it by creating a new trigger with fake values (temperature < 100 °C, or everything else could let an action to be raised).

References

Zabbix.com: Configuration page on the official documentation site

gammu-smsd: Gammu SMSD
Hosts Subnets Monitor (HSM): get notified when hosts’ subnets change

In the recent past I have been tasked to block traffic from a LAN segment toward some public websites by blackholing their subnets.

While this approach may be not fully convincing, it is easy to implement and with few impacts on the infrastructure. The real problem is the management overhead it introduces, since websites may change the IP subnet they are run on.

How does it work?

In order to ease this task I wrote a little script which, given a hosts list, resolves IP addresses and gets the most specific subnet they fall on. Public whois databases are used to acquire subnet information: RIPE RIS, TeamCymru IP to ASN Mapping, RIRs databases. Some of them (RIPE RIS and TeamCymru IP-to-ASN) are based on BGP feeds collected around the world, others (RIRs databases) are based on LIRs allocations and assignments; the configuration section of the script allows to set which databases have to be used and how.

Requirements

The script is written in Linux Bash and uses some basic programs and an optional (but really recommended) Perl addition (implemented in the hsm-utils.pl file).

The programs used by the script are dig (to resolve hostnames in IP addresses), whois (the improved Whois client by Marco D’Itri, to get data from whois databases) and sendmail, alias of exim4 (to send email notifications when subnets change).

The hsm-utils.pl script needs the NetAddr::IP::Lite module, which can be installed using the CPAN installer:

LINUX:~#perl -MCPAN -e shell
cpan>install NetAddr::IP::Lite

How to use it

To be used it just needs the “hosts” file in the working directory (/var/local/hsm by default) containing a list of hosts to be monitored:

LINUX:/var/local/hsm#cat hosts
www.facebook.com
www.blogspot.com
www.youtube.com
www.twitter.com

In order to receive email notifications the EMAIL_TO parameter has to be set with a working email address.

The script

Following is an excerpt from the script, I suggest you to read it since it contains some (I think) useful notes and configuration options; in the bottom of this post you may find the link to download it.

##################################################################################
# HOW DOES IT WORK?
# --------------------------------------------------------------------------------
#
# Everything is done in the DATA_DIR directory (default to /var/local/hsm); HSM
# reads a list of hosts to monitor from the 'hosts' file and, for each of them, it
# resolves the IP address and gets its subnet.
#
# In order to identify the subnet, it queries public databases using the whois
# client: it may be configured to use the following sources (see CONFIGURATION):
#
# - RIPE RIS database: http://www.ripe.net/ris/
# - TeamCymru IP to ASN Mapping: http://www.team-cymru.org/Services/ip-to-asn.html
# - general RIRs databases
#
# Subnets are stored in the 'subnets' file; at the end of the execution, if there
# are new subnets HSM notifies them in the output. It also notifies expired
# subnets, that is subnets appeared in the past which seem to be not binded to
# hosts anymore.
#
# Output is written to the 'output' file; you may let HSM to send the output by
# email too.
#
# The script may be scheduled to be run periodically through the crontab file.

##################################################################################
# REQUIREMENTS AND DEPENDENCIES
# --------------------------------------------------------------------------------
#
# dig           Used to resolve hostnames
#
# whois         I used the improved Whois client by Marco D'Itri:
#               http://www.linux.it/~md/software/
#
# sendmail      Used as alias of exim4; optional, only if EMAIL_TO is set
#
# awk, grep,    Some basic utilities
# tail, sed
#
# Highly Recommended:
#
# Perl with NetAddr::IP::Lite module, in order to execute the hsm-utils.pl script.
# Please see CHANGE LOG &amp; KNOWN ISSUES and USEHSMUTILS in the CONFIGURATION
# section for more details about it.
#
# Developed and tested under Debian GNU/Linux 4.0 (Etch).

##################################################################################
# CHANGE LOG &amp; KNOWN ISSUES
# --------------------------------------------------------------------------------
#
# Date          Ver.    Note
# 2010-11-15    0.1     First release
#
# If you configure HSM to not use the hsm-utils.pl script (see CONFIGURATION for
# more details) you have to consider the following issues:
#
# - subnets are stored as they appear on the whois output; that is
# &quot;192.168.0.0/24&quot; is different from &quot;192.168.0.0 - 192.168.0.255&quot;. This may lead
# to a wrong behaviour when the same IP address is queried against a whois
# database which returns information in a format different from the previous one.
#
# - when GENERAL whois is used, or when GETLONGESTMATCH = 1, there are no
# guarantees that the more specific subnet is choosen among those returned.

##################################################################################
# CONFIGURATION
# --------------------------------------------------------------------------------

# USEHSMUTILS
# ------------------------------------
# If USEHSMUTILS = 1 then HSM uses the hsm-utils.pl file.
# It is a Perl script which implements some functions
# performing subnets normalization and selection. It is
# needed to solve some issues reported in the CHANGE LOG
# &amp; KNOWN ISSUES section. If you can't run a Perl script
# or you prefer to avoid it you may set USEHSMUTILS to 0.

USEHSMUTILS=1
HSMUTILSPATH=`dirname $0`/hsm-utils.pl

# DATA_DIR
# ------------------------------------
# Where files are stored:
# - the file containing the input hosts list ('hosts')
# - one file for each IP address resolved by hostnames
# - the subnets file ('subnets'), where subnets information are stored
# - the output file ('output')
# - temporary files
# No trailing slash.

DATA_DIR=/var/local/hsm

# USECACHE and CACHE_TIME
# ------------------------------------
# If USECACHE = 1 then IP addresses resolved by hostnames
# are checked against whois databases only if they were
# checked before CACHE_TIME days ago.

USECACHE=1
CACHE_TIME=3

# DNS_QUERIES
# ------------------------------------
# HSM sends this number of DNS queries in order to resolve
# hostnames IP addresses. It may be useful to discover IP
# address of hostnames with round-robin records.

DNS_QUERIES=3

# SUBNET_EXPIRY
# ------------------------------------
# When a subnet is not seen for more than SUBNET_EXPIRY days
# it is removed from the subnets file and a notification
# is written in the output.

SUBNET_EXPIRY=15

# WHOIS_LIST and GETLONGESTMATCH
# ------------------------------------
# WHOIS_LIST contains a list of sources to be used to get
# subnets information from IP addresses.
# The following sources are allowed:
# TEAMCYMRU, RIPERIS, GENERAL.
# Sources are used in the order they appear in the list.
# If GETLONGESTMATCH = 0, as soon as HSM succeds to obtain
# the subnet it stops searching.
# If a source is not working properly it uses the next one.
# If GETLONGESTMATCH = 1 HSM grabs results from all the
# listed sources, then uses the most specific one.

WHOIS_LIST=&quot;RIPERIS TEAMCYMRU GENERAL&quot;
GETLONGESTMATCH=1

# EMAIL
# ------------------------------------
# Set EMAIL_TO with your email address if you want the output
# to be sent by email. The other parameters are optional.

EMAIL_TO=
EMAIL_FROM=
EMAIL_SUBJECT=

Download and installation

Here you can download the scriptLicensed under the terms of the GNU General Public License.

To run it:

LINUX:/usr/local/bin#tar -xf hsm.tar # extract it
LINUX:/usr/local/bin#nano hsm # do your configuration
LINUX:/usr/local/bin#nano /var/local/hsm/hosts # edit hosts you want to monitor
LINUX:/usr/local/bin#./hsm # run it

You may also schedule it using crontab:

LINUX:/usr/local/bin#cat /etc/crontab
# /etc/crontab: system-wide crontab

SHELL=/bin/sh
PATH=/usr/local/sbin:/usr/local/bin:/sbin:/bin:/usr/sbin:/usr/bin

# m h dom mon dow user  command
53 22   * * *   root    /usr/local/bin/hsm
#

Any feedback, comment or suggestion is appreciated! 🙂

sudppipe: a simple UDP proxy / port forwarder

I spent long time on Google looking for a simple Windows utility which let me take UPD packets on a host and forward them to another, and back. How to call it? A proxy? A port forwarder? Not a tunnel… A datapipe? A NAT or NAPT software? Well, yes, I’m listing here all the keywords I used to search it!

Something like this:

CLIENT -> HOST_A (proxy) -> HOST_B (real server)

Finally I found sudppipe, by Luigi Auriemma, and I want to share it, with the hope this post could raise its visibility and lower others’ search time.

Here is the author’s description:

advanced UDP proxy/datapipe/packets forwarder and modifier with multiple functions.
a datapipe is like a minimalistic proxy which acts as a bridge for connecting to a specific host, so the input connection can be any UDP client while the output is ever the same IP:port (clients->stcppipe->target).
it supports multiple clients allowed, creation of tcpdump capture files (like a sniffer), packets forwarding (chat style, each packet is forwarded to all the other clients and server connected), packets injection (the tool opens a specific UDP port to which is possible to send the customized packets that will be sent to the server), support for multiple target hosts plus some interesting options for controlling the outgoing sockets, hexadecimal visualization and plugins support for the modification and visualization of the packets (supports also the mysendto and myrecvfrom functions of the plugins of Proxocket).
in the package there are also some example plugins: Zdaemon huffman, Doom huffman, Half-life decoding and one for the replacement of the text strings.
the plugins (which work on both Windows and Linux) are very basic to create and use, just take a look at example_sudp.c for more informations.

Thanks Luigi! 😉